For a limited time only! All Bose® products are %25 off.

0
Shopping cart
There are no products in your cart.

Tutorial: Virtuemart Parameters of LightMart

As you might know. Virtuemart itself doesn't give much flexibility to play around with things. Most of the things are only possible with hard-coding. But with LightMart, you are allowed to make some changes, play around with the Virtuemart related pages.

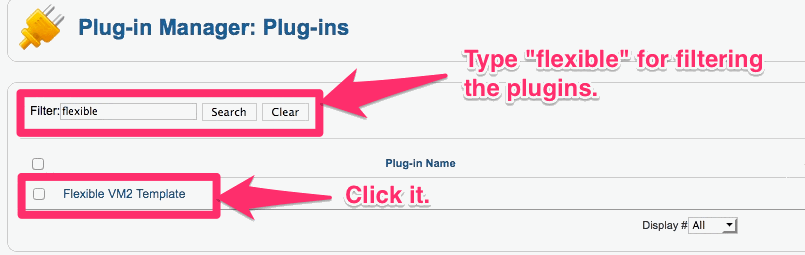
A Joomla Plugin called "Flexible VM2 Template" comes along with LightMart.

Find that plugin in your Joomla Plugin Manager:


In this plugin, you will see lots of parameters. No need to go over all of them, but once you see them, they will make more sense to you. Play around with them and customize the "Virtuemart Related" pages through it by changing the parameters.


Tutorial: How to create promotion modules

This tutorial will show you how to create "promotion" module that you see in this DEMO:


This is a pre-defined style and you can use this style any where you would like (in a module, or in an article). The HTML lines you should use is this:

<div>
<h5 class="promoTitle">iPad</h5>
<h6 class="promoSubTitle">Two sizes do all.</h6>
<a><img src="/lightmart/images/promo_1.png" border="0" /> </a> <a class="shopnowbubble" href="#"> Shop Now</a></div>

 The above lines will give you 1. promo box. I believe this more make sense to you now once you look at the HTML lines. You can edit the TEXTS and change the IMAGE then paste the above codes anywhere you would like (modules,article etc..)

Tutorial: Multiple Columns for the Menu Items

This tutorial will show you how to have multiple columns for the menu items (2.child).

For instance, in this DEMO:

MOBILE SPEAKERS menu item have 3 columns for 2.child items. But on the other hand; EARPHONES menu item has 5 columns for 2.child items. You can define those columns through the menu manager.

1- Open the 1.child menu item (that you are going to add columns for its child menu items)


2- Click the "Page Display Options" Tab.

3- To the "Page Class" field, enter one of these:

  • columns-1: NO NEED TO TYPE ANYTHING, LEAVE BLANK. DEFAULT IS ALREADY columns-1
  • columns-2: to make 2 columns
  • columns-3: to make 3 columns
  • columns-4: to make 4 columns
  • ....
  • ....
  • ....
  • columns-N: to make N columns


Tutorial: Menu items with Product Images

This tutorial will show you how to create menu item with a product picture (just like how it is in this DEMO)

1- Open the "Menu Manager" and open the 2.child. Be careful, this should be 2. child. For instance; In this DEMO 1.CHILD is EARPHONES, and the 2.CHILDs are APPLE EARPOD, BOSE MIE2I, BOSE SIE3I etc..


2- Then from the left hand side, click the "Link Type Options" TAB and then click the "Select" button from the "Link Image" section.


3- You might guess the rest. Just pick an image from there. and boom!

That's all!

iPad
Two sizes do all.
Shop Now
Samsung Galaxy S4
Inspired by nature.
Shop Now
Windows Surface
Click in and do more.
Shop Now
iPhone 5
Loving it is easy.
Shop Now

Blowout Deals 

Like us on Facebook. Enjoy exclusive discount offers, and more.
Get 15% off your next purchase